

A Comprehensive Hyper-V Tutorial: Getting Started with Virtualization
Introduction
Virtualization has become an integral part of modern IT infrastructure, providing flexibility, scalability, and cost-effectiveness. Hyper-V, Microsoft’s virtualization platform, is a powerful tool for creating and managing virtual machines (VMs). In this tutorial, we’ll guide you through the process of setting up and using Hyper-V for your virtualization needs.
Understanding Hyper-V
What is Hyper-V?
Hyper-V, short for Hyper-Virtualization, is Microsoft’s hypervisor-based virtualization platform. It allows users to create and manage virtual machines (VMs) on a Windows environment. A hypervisor is a software layer that enables multiple operating systems to share a single hardware host. Hyper-V provides a virtualized environment where multiple VMs can run independently, each with its own operating system, applications, and resources.
Hyper-V is commonly used in enterprise settings for server virtualization, enabling administrators to consolidate workloads, improve resource utilization, and enhance scalability. It is also available for Windows 10 and Windows 11 for desktop virtualization, making it a versatile solution for various virtualization needs.
Key features of Hyper-V include support for various operating systems, dynamic memory allocation, live migration for workload mobility, and integration with other Microsoft technologies. Understanding the fundamentals of Hyper-V is crucial for efficiently deploying and managing virtualized environments within the Windows ecosystem.
Understanding Hyper-V: Key Features and Benefits
Hyper-V comes with a range of powerful features that contribute to its effectiveness as a virtualization solution. Here are some key features and benefits:
Scalability
Hyper-V allows organizations to scale their IT infrastructure by running multiple VMs on a single physical server. This scalability is essential for accommodating growing workloads and optimizing hardware resources.
Support for Various Operating Systems
Hyper-V supports a wide range of guest operating systems, including various versions of Windows, Linux distributions, and others. This flexibility makes it suitable for diverse application environments.
Live Migration
One of Hyper-V’s standout features is live migration, which enables the movement of running VMs from one host to another with minimal downtime. This ensures high availability and facilitates maintenance without impacting service continuity.
Integration with Microsoft Ecosystem
Hyper-V seamlessly integrates with other Microsoft technologies, such as Windows Server, Active Directory, and System Center. This integration simplifies management tasks and enhances compatibility within the Microsoft ecosystem.
Dynamic Memory Allocation
Hyper-V includes dynamic memory allocation, allowing VMs to adjust their memory usage based on demand. This feature optimizes resource utilization and enhances overall system performance.
Snapshot and Checkpoint Functionality: Administrators can take snapshots or checkpoints of VMs at specific points in time. This feature is valuable for backup purposes, testing configurations, and quickly reverting to a previous state in case of issues.
Security Features
Hyper-V incorporates security measures such as isolation between VMs and secure boot, contributing to a secure virtualized environment. These features are crucial for maintaining the integrity of virtualized workloads.
Understanding these features and benefits is essential for harnessing the full potential of Hyper-V, whether you are virtualizing servers, desktops, or a combination of both in your computing environment.
System Requirements
Hardware Requirements
Before diving into the installation of Hyper-V, it’s crucial to ensure that your hardware meets the necessary requirements. Hyper-V leverages hardware-assisted virtualization, so your system must support this feature. Here are the key hardware requirements:
64-bit Processor with Second-Level Address Translation (SLAT)
Hyper-V requires a 64-bit processor that supports SLAT. SLAT is a hardware virtualization technology that enhances the performance of virtual machines by providing efficient memory management.
Virtualization Technology (Intel VT-x/AMD-V)
Ensure that your processor supports virtualization technology. For Intel processors, this feature is known as VT-x, while AMD processors use AMD-V. Virtualization technology enables the processor to handle virtualization workloads more efficiently.
Sufficient RAM (Random Access Memory)
Allocate an adequate amount of RAM to support the virtual machines you intend to run. Hyper-V itself consumes some memory, and each VM requires its own portion of RAM.
Disk Space: Ensure you have sufficient disk space for the Hyper-V installation and storage of virtual machines. Consider the size of the operating systems and applications you plan to run within the virtual machines.
I/O Virtualization (Intel VT-d/AMD-Vi): Although not mandatory, having support for I/O virtualization technology enhances the performance and efficiency of input/output operations within virtual machines. Intel VT-d and AMD-Vi are the respective technologies for this purpose.
Motherboard Compatibility
Check if your motherboard supports virtualization features. This information is typically available in the motherboard’s BIOS or UEFI settings. It’s essential to consult your hardware documentation or the manufacturer’s website to verify specific compatibility details. Meeting these hardware requirements ensures a smooth Hyper-V installation and optimal performance of virtualized workloads on your system.
Installing Hyper-V
Enabling Hyper-V on Windows 10 and 11
Hyper-V is available as a feature on Windows 10 and Windows 11 Pro, Enterprise, or Education editions. Enabling Hyper-V involves turning on the Hyper-V feature through the Windows Features menu. Here’s a step-by-step guide for enabling Hyper-V on Windows 10/11:
Check System Requirements
Before proceeding, confirm that your system meets the hardware requirements for Hyper-V. Refer to the hardware requirements outlined in Section 2a.
Open Control Panel
For Windows 10: Right-click on the Start button and select “Control Panel.”
For Windows 11: Right-click on the Start button, choose “Settings,” and then click on “System.”
Navigate to “Programs” > “Turn Windows features on or off”
In Windows 10, you’ll find this under the “Programs” category. In Windows 11, click on “Apps” in the Settings window, then select “Optional Features,” and click on “Add a feature.”
Locate “Hyper-V” in the Features List
In the Windows Features window, scroll down to find “Hyper-V.” Check the box next to “Hyper-V” to enable the feature.
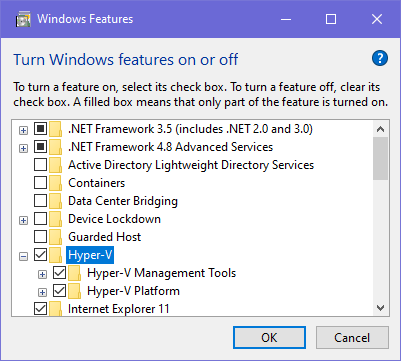
Install Hyper-V
Click “OK” or “Apply” to start the installation process. Windows will prompt you to restart your computer to complete the installation.
Restart Your Computer
Save any open work and restart your computer to apply the changes.
Verify Hyper-V Installation
After the restart, open the Start menu and search for “Hyper-V Manager.” If the Hyper-V Manager is present in the search results, the installation was successful.
Configure Hyper-V Settings (Optional)
Open Hyper-V Manager, and from the Actions pane, you can configure settings such as default locations for virtual machines and virtual hard disks.
That’s all! You have successfully enabled Hyper-V on your Windows 10 or Windows 11 system. You are now ready to create and manage virtual machines using the Hyper-V Manager.
Installing Hyper-V on Windows Server
Hyper-V is a feature that can be installed on Windows Server operating systems to enable virtualization. Here’s a step-by-step guide on installing Hyper-V on a Windows Server:
Access Server Manager
Log in to your Windows Server and open “Server Manager.” This is typically available on the taskbar or can be accessed from the Start menu.
Add Roles and Features
In Server Manager, click on “Manage” from the top menu, and then select “Add Roles and Features.”

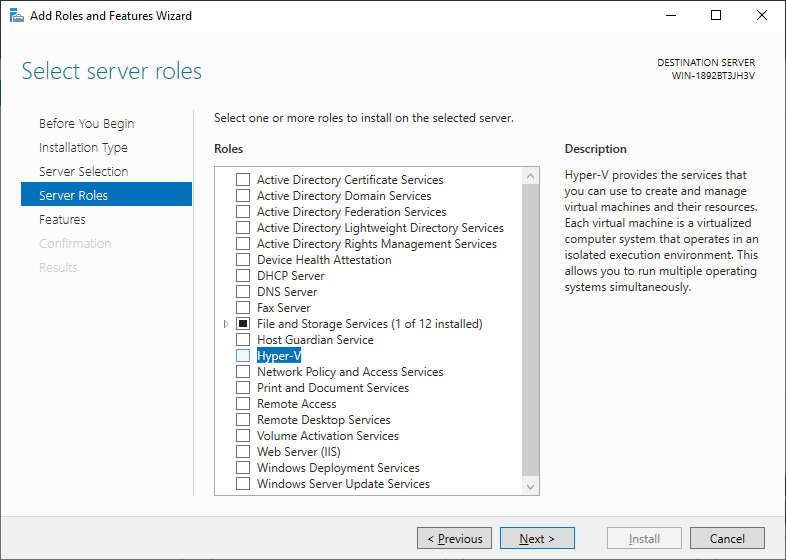
Role-based or Feature-based Installation
Choose “Role-based or feature-based installation” and click “Next.” Select the Server: Ensure the local server is selected, and click “Next.” Choose Hyper-V. In the “Select server roles” window, scroll down to find “Hyper-V.” Check the box next to it.
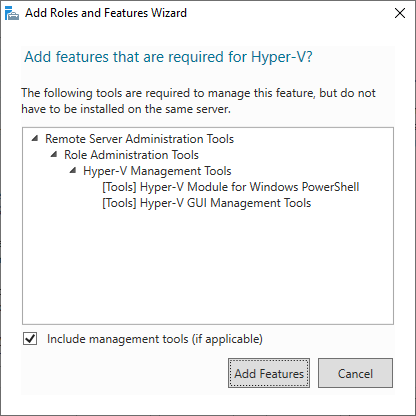
Add Features
Windows may prompt you to add features that are required for Hyper-V. Click “Add Features” to include the necessary components.
Confirm Installation
Review the information on the “Features” page, and click “Next.”
Hyper-V Settings
On the “Hyper-V” page, you can review information about Hyper-V. Click “Next.”
After selecting Hyper-V, confirm the next screen:
Choose Virtual Switches (Optional)
If you have multiple network adapters, you may be prompted to configure virtual switches. Choose the appropriate settings and click “Next.”
Specify Where to Store Virtual Machines
Choose the location where you want to store virtual machine files. Click “Next.”
Complete the Wizard
Review your selections on the “Summary” page and click “Install” to start the installation process. and wait for the installation to complete. The server may need to restart to apply the changes. Then verify Hyper-V Installation. After the restart, open “Server Manager,” and under the “Tools” menu, you should find “Hyper-V Manager.” This confirms that Hyper-V has been successfully installed.
You have now installed Hyper-V on your Windows Server, and you can begin creating and managing virtual machines to meet your specific server virtualization needs.
Hyper-V Manager Overview
Navigating the Interface
Hyper-V Manager is the central tool for managing virtual machines, virtual switches, and other Hyper-V components. Understanding its interface is essential for efficiently managing your virtualized environment. Here’s an overview of navigating the Hyper-V Manager interface:
Opening Hyper-V Manager
Launch Hyper-V Manager from the Start menu or by searching for “Hyper-V Manager” in the Start menu search bar.
Connect to a Hyper-V Host
If you are managing a remote Hyper-V host, click on “Connect to Server” in the Actions pane on the right. Enter the name of the server and click “Connect.”

Hyper-V Manager Console
The main console is divided into two panes: the left pane, which displays the navigation tree, and the right pane, which shows the details of the selected item.
Navigation Tree
The navigation tree on the left lists the Hyper-V host and its associated components. These include Virtual Machines, Hyper-V Settings, Virtual Switch Manager, and more.
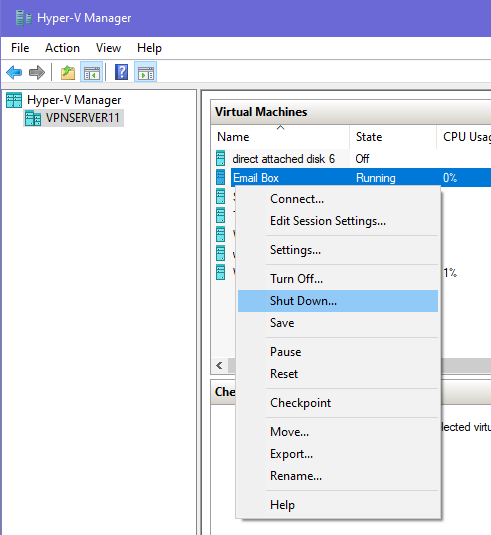
Virtual Machines
Under “Virtual Machines,” you’ll find a list of all VMs on the host. Right-clicking on a VM allows you to perform actions such as Start, Stop, Snapshot, and Settings.
Actions Pane
The Actions pane on the right provides quick access to common tasks. It includes options such as Connect to Server, Create Virtual Machine, Import Virtual Machine, and more.
Details Pane
The right pane displays details about the selected item in the navigation tree. For example, selecting a virtual machine will show information about its state, settings, and resource usage.
Hyper-V Toolbar
At the top of the Hyper-V Manager window, you’ll find a toolbar with options for managing the Hyper-V host. This includes starting and stopping VMs, creating new VMs, and accessing Hyper-V settings.
Creating New Virtual Machines
To create a new VM, click on “Action” in the menu, select “New,” and choose “Virtual Machine.” The New Virtual Machine Wizard will guide you through the VM creation process.

Virtual Switch Manager
Access the Virtual Switch Manager from the navigation tree to configure virtual switches, which are crucial for connecting VMs to networks.
Understanding how to navigate the Hyper-V Manager interface is fundamental to efficiently managing virtualized resources. Whether you’re creating new virtual machines, adjusting settings, or monitoring performance, Hyper-V Manager provides a centralized hub for these tasks.
Creating Virtual Machines
Step-by-Step Guide
Now that Hyper-V is set up and the Hyper-V Manager interface is familiar, let’s explore how to create virtual machines (VMs). Follow this step-by-step guide to create your first VM:
Open Hyper-V Manager
Launch Hyper-V Manager on your Windows system.
Navigate to “Virtual Machines”
In the left navigation tree, click on “Virtual Machines.” This will display a list of existing VMs.
Click “Action” and Select “New” > “Virtual Machine”
In the Actions pane on the right, click on “Action,” then choose “New” and finally select “Virtual Machine.”
New Virtual Machine Wizard
The wizard will guide you through the VM creation process. Click “Next” to begin.

Specify Name and Location
Enter a name for your virtual machine and choose a location to store its files. Click “Next.”
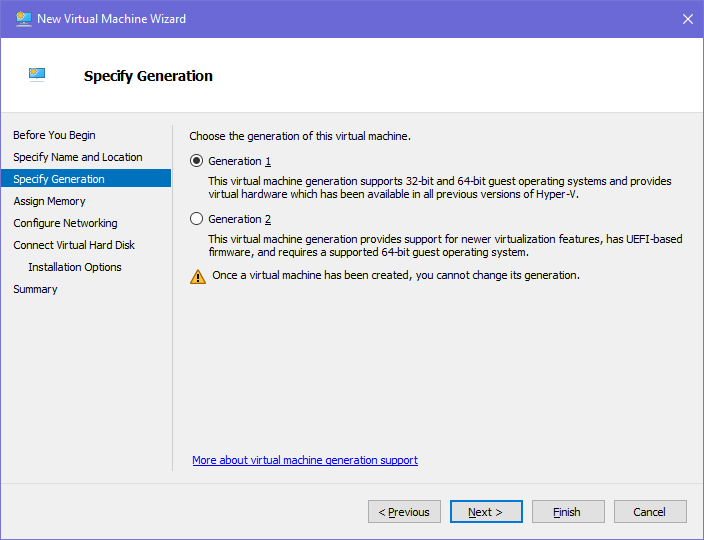
Specify Generation
Choose the generation for your VM (Generation 2 is recommended for modern operating systems). Click “Next.”
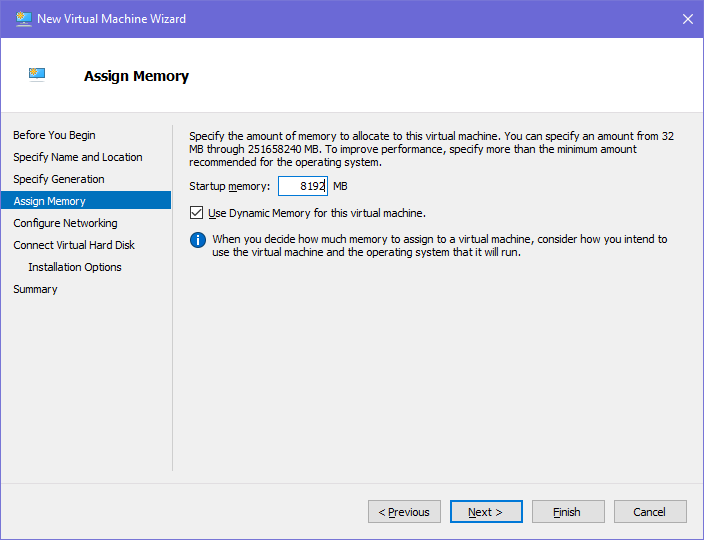
Assign Memory
Specify the amount of memory (RAM) to allocate to the VM. Consider the requirements of the guest operating system and the applications you plan to run. Click “Next.”
Configure Networking
Choose a virtual switch to connect your VM to a network. If you haven’t created a virtual switch yet, you can do so using the Virtual Switch Manager. Click “Next.”

Connect Virtual Hard Disk
Create a new virtual hard disk or use an existing one. Specify the size of the virtual hard disk and its location. Click “Next.”

Installation Options
Choose how you want to install the operating system on the VM. You can install it later or use an installation disc/image. Click “Next.”

Complete Wizard
Review your selections on the summary page. Check the box that says “Start the virtual machine after it is created” if you want to start the VM immediately. Click “Finish” to complete the wizard.
Installation of the Guest Operating System
If you selected an installation option, the VM will start, and you can proceed with installing the guest operating system.
Finished! You’ve successfully created a virtual machine using Hyper-V. You can now customize the VM further by adjusting settings, installing additional software, and managing it through the Hyper-V Manager interface. Repeat these steps to create additional virtual machines as needed for your virtualization environment.
Installing Guest Operating Systems
Installing Guest Operating Systems: Windows on a Virtual Machine
After creating a virtual machine (VM) in Hyper-V, the next step is to install the guest operating system. Here’s a step-by-step guide for installing Windows on a virtual machine:
Start the Virtual Machine
Open Hyper-V Manager and ensure your newly created VM is selected in the Virtual Machines list. Right-click on the VM and choose “Start” to power it on.

Connect to the Virtual Machine
Right-click on the VM again and select “Connect” to open the VM’s console window.
Insert Windows Installation Media
If you have a Windows installation disc, insert it into the physical drive. Alternatively, if you have an ISO file, go to the VM’s menu bar, click on “Media,” and select “Insert Disk…”
Start the Virtual Machine
With the installation media inserted, start the virtual machine. It will boot from the Windows installation media.
Windows Setup
The Windows setup process will begin. Follow the on-screen instructions to select language, time, and keyboard input.
Install Now
Click on “Install Now” to begin the Windows installation process.
Enter Product Key
Enter the Windows product key when prompted. Follow the instructions to proceed.
Choose Edition and Accept License Terms
Select the Windows edition you want to install (e.g., Windows 10 Pro) and accept the license terms. Click “Next.”
Custom Installation
Choose the “Custom: Install Windows only (advanced)” option.
Select Disk
Select the virtual hard disk you created for the VM. Click “Next” to start the installation.
Complete Installation
Allow the installation process to complete. The VM will restart during this process.
Set Up Windows
Follow the on-screen instructions to set up Windows. This includes creating a user account, setting a password, and configuring additional settings.
Install Integration Services (Optional, older Hyper-V Versions)
After Windows is installed, it’s recommended to install Hyper-V Integration Services. In the VM’s menu bar, click on “Action” > “Insert Integration Services Setup Disk.” Follow the prompts to complete the installation.
Finish Setup
Complete any remaining setup steps and finalize the installation. You now have a virtual machine running Windows within your Hyper-V environment. Now you have successfully installed Windows on a virtual machine using Hyper-V. Repeat these steps for additional virtual machines or other guest operating systems as needed.
Installing Linux on a VM
Installing Guest Operating Systems: Linux on a Virtual Machine
If you’re looking to install Linux on a virtual machine (VM) within Hyper-V, the process is slightly different from installing Windows. Here’s a step-by-step guide:
Download a Linux Distribution
Choose a Linux distribution that you want to install on the VM. Download the ISO file from the official distribution website.
Start the Virtual Machine
Open Hyper-V Manager, ensure your VM is selected, and start it by right-clicking and choosing “Start.”
Connect to the Virtual Machine
Right-click on the VM and select “Connect” to open the VM’s console window.
Insert Linux Installation Media
Go to the VM’s menu bar, click on “Media,” and select “Insert Disk…” Choose the downloaded Linux ISO file.
Start the Virtual Machine
With the Linux installation media inserted, start the virtual machine. It will boot from the Linux ISO.
Linux Installation Menu
The Linux installation menu will appear. Select the option to start the installation process.
Language and Keyboard Settings
Choose the language and keyboard settings for the Linux installation.
Select Installation Option
Choose the installation option that suits your needs (e.g., “Install Ubuntu” for Ubuntu Linux).
Disk Partitioning
During the installation, you’ll reach a point where you need to partition the disk. You can choose automatic partitioning or manual partitioning based on your preference.
User Account and Password
Provide information for creating a user account, including a username and password.
Complete Installation
Allow the Linux installation process to complete. The VM will restart during this process.
Eject Installation Media
After the installation is complete, go to the VM’s menu bar, click on “Media,” and select “Eject Disk” to remove the Linux installation media.
Log In
Once the VM restarts, log in using the credentials you created during the installation.
Install Integration Services (Optional):
If your Linux distribution supports Hyper-V Integration Services, you may want to install them for improved performance. Check the documentation for your specific distribution for guidance.
Congratulations! You’ve successfully installed Linux on a virtual machine within Hyper-V. Repeat these steps for additional VMs or different Linux distributions as needed.
Virtual Machine Snapshots and Checkpoints
Creating and Managing Virtual Machine Snapshots and Checkpoints
Virtual machine snapshots and checkpoints are essential features in Hyper-V that allow you to capture the state of a virtual machine at a specific point in time. Snapshots are useful for backup purposes, testing configurations, and quickly reverting to a previous state if needed. Here’s a guide on creating and managing snapshots and checkpoints in Hyper-V:
Open Hyper-V Manager
Launch Hyper-V Manager on your Windows system.
Select the Virtual Machine
In the left navigation tree, click on “Virtual Machines” to see a list of your VMs. Select the VM for which you want to create a snapshot.
Create Snapshot
Right-click on the selected VM, choose “Checkpoint,” and then click on “Create Checkpoint.” Enter a name and description for the snapshot if desired. Click “Yes” to confirm.

View Snapshots
To view existing snapshots, right-click on the VM and select “Checkpoint.” You’ll see a list of snapshots, including the date and time they were created.
Apply a Snapshot
If you want to revert to a specific snapshot, right-click on the snapshot you want to apply and select “Apply.” Confirm the action to restore the VM to the state captured in that snapshot.
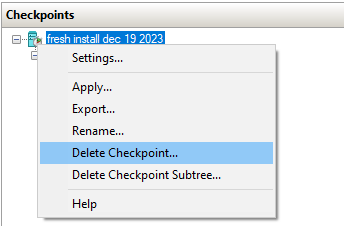
Delete a Snapshot
To delete a snapshot, right-click on the snapshot and choose “Delete Checkpoint.” You’ll be prompted to choose whether to delete only the checkpoint or the checkpoint and its associated files. Deleting a snapshot is a permanent action.

Restore Virtual Machine
If you have applied a snapshot and later decide to revert to the current state of the VM, you can right-click on the VM, choose “Checkpoint,” and then select “Go to.” This action will remove all existing checkpoints and revert the VM to its current state.
Automatic Checkpoints
Hyper-V can be configured to take automatic checkpoints. Right-click on the Hyper-V host in Hyper-V Manager, select “Hyper-V Settings,” go to “Automatic Stop Action,” and configure the settings under “Checkpoints.”
Monitoring Checkpoint State
The state of the checkpoints is displayed in the “Status” column in Hyper-V Manager. It indicates whether a VM is running, turned off, or in a checkpoint state.
Considerations
Be mindful of storage space when using snapshots, as they can consume significant disk space over time. Regularly review and manage your snapshots to ensure efficient use of resources.
Understanding how to create, manage, and use snapshots is crucial for maintaining the desired state of your virtual machines and ensuring quick recovery in case of issues or changes.
Networking in Hyper-V
Configuring Virtual Switches
Configuring virtual switches is a fundamental aspect of networking in Hyper-V, allowing virtual machines to communicate with each other and with the external network. Here’s a step-by-step guide on how to create and configure virtual switches in Hyper-V:
Open Hyper-V Manager:
Launch Hyper-V Manager on your Windows system.
Navigate to Virtual Switch Manager
In the left navigation tree, click on “Virtual Switch Manager” under the Hyper-V host.
Choose Virtual Switch Type
In the Virtual Switch Manager, you’ll see options for three types of virtual switches: External, Internal, and Private.
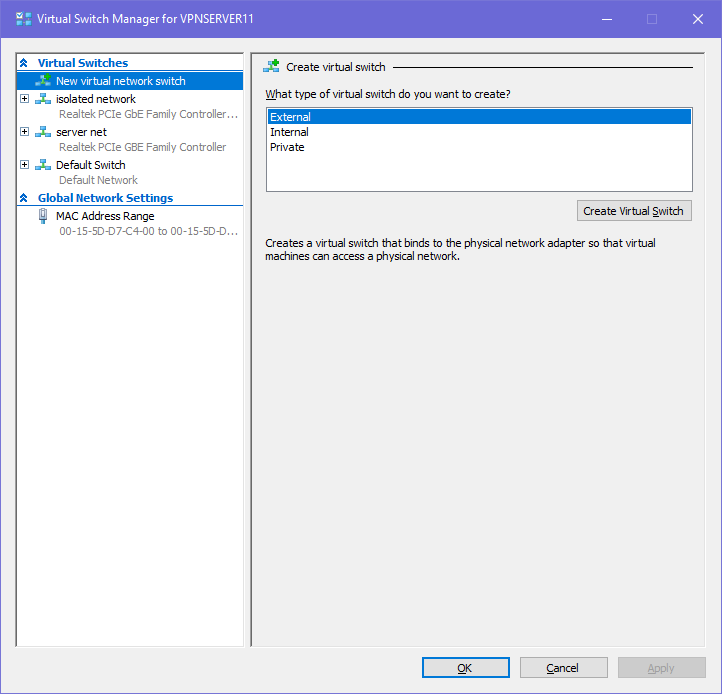
External Switch
Connects virtual machines to the physical network.
Internal Switch
Enables communication between virtual machines and the host system.
Private Switch
Creates an isolated network for communication between virtual machines only.
Create an External Virtual Switch
If you’re creating an external switch, select “External” and click on “Create Virtual Switch.” Choose the physical network adapter to associate with the external switch and provide a name for the switch. Optionally, check the box to allow the host operating system to share the network adapter.

Create an Internal or Private Virtual Switch
For an internal or private switch, select the respective option, provide a name, and click on “Create Virtual Switch.”
Configure Virtual Switch Properties
Select the virtual switch from the list and click on “Properties” to configure additional settings. Here, you can adjust the bandwidth management, enable DHCP guard, set MAC address spoofing, and more.
Associate Virtual Machines with Virtual Switch
In Hyper-V Manager, open the settings of a virtual machine. Under the “Networking” tab, select the virtual switch to associate with the virtual machine.
Adjust Advanced Features (Optional)
Depending on your network requirements,you may want to explore advanced features such as Quality of Service (QoS) settings, VLAN configurations, or bandwidth management.
Apply Changes
Once you’ve configured the virtual switches and associated them with virtual machines, click “Apply” or “OK” to save the changes.
Testing Connectivity
Start the virtual machines and test network connectivity. Virtual machines connected to the same virtual switch should be able to communicate, and those connected to an external switch can access the external network.
Monitoring Network Usage
Use Hyper-V Manager to monitor network usage and performance. Check the “Summary” tab for each virtual machine to view network statistics.
Configuring virtual switches in Hyper-V provides the foundation for establishing network connectivity within your virtualized environment. Whether you’re setting up isolated networks, connecting to the external network, or enabling communication between virtual machines and the host, virtual switches play a crucial role in defining network behavior.
Storage Management
Storage Management in Hyper-V: Understanding Virtual Hard Disks (VHDXs)
Efficient storage management is essential in Hyper-V to ensure optimal performance and resource utilization for virtual machines. Understanding Virtual Hard Disks (VHDs) and their management is a key aspect of this process. Here’s a guide on managing storage in Hyper-V:
Open Hyper-V Manager
Launch Hyper-V Manager on your Windows system.
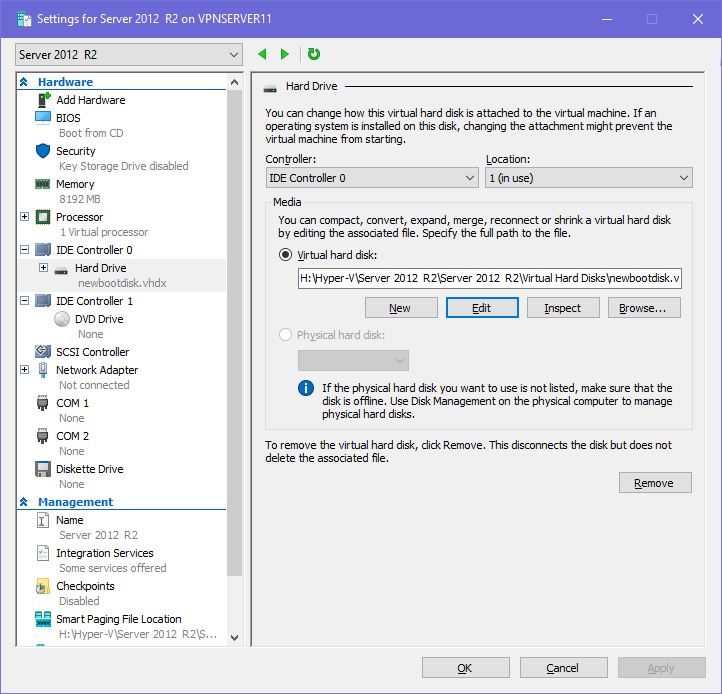
Navigate to Virtual Hard Disks
In the left navigation tree, click on “Hyper-V Manager” under the Hyper-V host. Then, click on “Edit Disk” in the Actions pane on the right.
Understanding Virtual Hard Disk Types
Hyper-V supports different types of virtual hard disks, including: VHD (Virtual Hard Disk): The legacy format, suitable for basic needs. VHDX (Hyper-V Virtual Hard Disk): The modern format, offering improved performance, scalability, and resilience.
Creating a Virtual Hard Disk
To create a new virtual hard disk, right-click on the VM, select “New” > “Hard Disk,” and follow the wizard. Choose the VHDX format for enhanced features.
Attaching an Existing Virtual Hard Disk
If you have an existing virtual hard disk, you can attach it to a virtual machine. Right-click on the VM, select “Settings,” go to the “SCSI Controller,” click “Hard Drive,” and choose “Existing Disk.”
Expanding or Shrinking Virtual Hard Disks
To resize a virtual hard disk, use the “Edit Disk” option in Hyper-V Manager. This allows you to expand or shrink the disk size, but ensure the guest operating system supports the changes.

Optimizing Storage Performance
Consider optimizing storage performance by using high-performance disks, utilizing RAID configurations, and employing storage technologies like Storage Spaces.
Using Differencing Disks (Optional)
Differencing disks allow you to create a parent-child relationship between virtual hard disks, saving disk space. Be cautious with this feature, as changes in the parent disk can affect the child disk.
Monitoring Disk Usage
Regularly monitor disk usage within Hyper-V Manager to ensure that virtual machines have adequate space and to identify any potential storage issues.
Backup and Recovery
Implement a robust backup strategy that covers all likely risk scenarios (see Discussion of Backup Strategies and Sample as a starting point) for virtual machines and their associated virtual hard disks. This ensures data integrity and facilitates recovery in case of data loss or VM failure.
Consider Storage Spaces Direct (Optional)
For advanced storage configurations, consider using Storage Spaces Direct in a clustered environment. This technology allows for the creation of a software-defined storage infrastructure.
Review and Optimize Storage Settings
Periodically review and optimize storage settings, including the placement of virtual hard disks, to align with the performance requirements of your virtualized workloads.
Understanding and effectively managing virtual hard disks are crucial for maintaining an efficient and reliable virtualization environment in Hyper-V. Regularly review storage configurations and adopt best practices to ensure the optimal performance and resilience of your virtual machines.
Storage Management in Hyper-V: Best Practices and Tips
Optimizing storage management in Hyper-V is essential for achieving high performance, reliability, and efficient resource utilization. Here are some best practices and tips for effective storage management in Hyper-V:
Choose VHDX Format
Prefer using VHDX over the legacy VHD format. VHDX offers improved performance, scalability, and resilience. It supports larger disk sizes and provides benefits such as increased protection against data corruption.
Proper Disk Sizing
Plan and allocate disk space appropriately for virtual hard disks. Avoid overprovisioning, but ensure that virtual machines have sufficient space for their intended workloads.
Dynamic Disk Usage
Consider using dynamically expanding disks for non-critical workloads. These disks grow as needed, optimizing storage utilization. However, be mindful of potential performance implications during disk expansion.
Use Fixed-Size Disks for Performance-Critical Workloads
For performance-sensitive workloads, opt for fixed-size disks. Fixed-size disks provide consistent performance as they allocate the entire disk space upfront. Upfront allocation avoids fragmentation on the host disk and therefore better caching and disk read/write performance.
Implement Storage Spaces Direct (S2D)
In a clustered environment, consider implementing Storage Spaces Direct (S2D). S2D enables the use of local storage in cluster nodes to create a highly available and scalable storage infrastructure.
Regularly Monitor Storage Performance
Use performance monitoring tools to track storage performance metrics. Monitor disk latency, throughput, and IOPS (Input/Output Operations Per Second) to identify potential bottlenecks or issues.
Implement Quality of Service (QoS)
If supported by your storage infrastructure, implement Quality of Service to allocate and prioritize storage resources among virtual machines. This helps ensure fair access to storage resources.
Backup Virtual Machines and VHDs
Use a Hyper-V Backup Solution for virtual machines and their associated virtual hard disks. Regularly back up critical data to prevent data loss and facilitate recovery in case of failures.
Periodically Defragment Guest File Systems
Periodically defragment the file systems within virtual machines. This can help optimize storage performance by reducing file fragmentation.
Avoid Storing Virtual Machines on System Drive
Avoid storing virtual machines on the system drive of the Hyper-V host. Instead, use dedicated drives or storage spaces to host virtual machines for better performance and separation of resources.
Configure Hyper-V Storage Quality of Service (QoS)
If your storage system supports it, configure Hyper-V Storage Quality of Service to control and manage storage I/O for virtual machines.
Regularly Review and Optimize Storage Configurations
Periodically review and optimize storage configurations based on the evolving needs of your virtualized workloads. Adjust disk sizes, storage locations, and configurations as necessary.
Implementing these best practices and tips will contribute to a well-optimized and resilient storage infrastructure in your Hyper-V environment. Regular monitoring, strategic planning, and adherence to best practices are key to ensuring optimal storage performance for virtualized workloads.
Integration Services
Enhancing Virtual Machine Functionality
Integration Services in Hyper-V play a crucial role in enhancing the functionality and performance of virtual machines. These services, also known as Integration Components, enable seamless communication between the host and guest operating systems, providing improved integration, performance, and management capabilities. Here’s a guide on Integration Services in Hyper-V:
Understanding Integration Services
Integration Services are a set of drivers and services that enhance the interaction between the Hyper-V host and the guest operating systems running in virtual machines. They improve communication, optimize performance, and enable additional features. Note, new Windows and Linux versions already contain Hyper-V Integration Services.
Automatic Installation
Integration Services are typically installed automatically when you install a supported guest operating system on a virtual machine. However, it’s essential to keep the Integration Services up to date by applying the latest Hyper-V updates.
Key Components of Integration Services
The Integration Services include components such as:
- Hyper-V Time Synchronization: Keeps the guest operating system time synchronized with the host.
- Mouse Integration: Enhances mouse responsiveness and allows seamless movement between host and guest.
- Heartbeat Integration: Monitors the health of the guest operating system.
- Shutdown Integration: Facilitates graceful shutdown of the virtual machine.
- Backup (Volume Snapshot) Integration: Enables consistent backups of the virtual machine.
Upgrading Integration Services
As Hyper-V evolves, new versions of Integration Services are released. After updating the Hyper-V host, it’s recommended to upgrade the Integration Services on existing virtual machines for compatibility and improved features.
Enabling or Disabling Integration Services
You can enable or disable specific Integration Services components for a virtual machine. Open Hyper-V Manager, select the virtual machine, go to “Action” > “Insert Integration Services Setup Disk,” and follow the prompts to enable or disable components.
Performance Benefits
Integration Services contribute to enhanced performance by optimizing communication between the host and guest. Improved mouse responsiveness, time synchronization, and efficient communication channels lead to better overall performance.
Integration Services for Linux Guests
Integration Services are not limited to Windows guests. Hyper-V supports Integration Services for various Linux distributions, providing similar benefits, including improved mouse integration, time synchronization, and enhanced performance.
Considerations for Virtual Machine Migration
When migrating virtual machines between Hyper-V hosts, ensure that the Integration Services versions on the source and destination hosts are compatible. This ensures a smooth migration process.
Hyper-V Replica Integration
If using Hyper-V Replica for disaster recovery, Integration Services help maintain synchronization between primary and replica virtual machines.
Periodic Review and Update
Regularly review the Integration Services status for virtual machines and update them as needed. This ensures that virtual machines leverage the latest features and improvements.
Troubleshooting Integration Services
In case of issues, such as Integration Services not working correctly, consider reinstalling or updating them. Check event logs and Hyper-V Manager for diagnostic information.
Backup Considerations
Integration Services play a role in facilitating consistent backups. Ensure that Integration Services are functioning correctly for reliable and effective backup operations.
Integration Services form a critical part of the Hyper-V ecosystem, contributing to the seamless operation and performance optimization of virtual machines. Regularly updating, enabling, and troubleshooting Integration Services ensure that your virtualized environment remains efficient and reliable.
Dynamic Memory Allocation In Hyper-V
Dynamic Memory Allocation and Optimizing Resource Utilization
Dynamic Memory Allocation is a feature in Hyper-V that allows virtual machines to dynamically adjust their memory allocation based on workload requirements. This feature optimizes resource utilization, improves performance, and enables efficient use of available memory. Here’s a guide on Dynamic Memory Allocation in Hyper-V:
Understanding Dynamic Memory
Dynamic Memory allows virtual machines to automatically adjust their memory usage based on demand. This means that virtual machines can receive additional memory when needed and release memory when it’s no longer required.
Configuring Dynamic Memory
Dynamic Memory is configured on a per-virtual machine basis. In Hyper-V Manager, select the virtual machine, go to “Settings,” and under “Memory,” enable the “Enable Dynamic Memory” option. Set the minimum and maximum memory values based on your requirements.

Minimum and Maximum Memory Settings
Specify the minimum and maximum memory values for a virtual machine. The minimum value represents the guaranteed amount of memory, while the maximum value sets the upper limit that the virtual machine can use.
Memory Buffer
The memory buffer is an additional amount of memory that can be allocated to a virtual machine to handle short-term spikes in memory usage. It helps prevent the need for immediate allocation adjustments.
Memory Weight
Memory weight allows you to prioritize memory allocation among virtual machines when there is contention for resources. Higher-weighted virtual machines are given preference in receiving additional memory.
Balloon Driver
The Hyper-V Integration Services include a balloon driver that can be used to reclaim memory from the guest operating system when there is memory pressure. This helps in efficiently managing memory resources.
Automatic Memory Adjustment
With Dynamic Memory, Hyper-V can automatically adjust the memory allocated to virtual machines based on their current workload. This ensures that virtual machines receive the necessary resources without manual intervention.
Monitoring Memory Usage
Regularly monitor memory usage within Hyper-V Manager or using performance monitoring tools. Keep an eye on memory metrics to ensure that virtual machines have adequate resources.
Considerations for Different Workloads
Adjust Dynamic Memory settings based on the specific requirements of different workloads. Workloads with varying memory needs can benefit significantly from Dynamic Memory Allocation.
Compatibility with Hyper-V Replica
Dynamic Memory works seamlessly with Hyper-V Replica. When using Hyper-V Replica for disaster recovery, consider the dynamic memory settings to ensure consistency between primary and replica virtual machines.
Guest Operating System Awareness
Guest operating systems need to be aware of Dynamic Memory to take full advantage of its benefits. Ensure that Integration Services are up to date in virtual machines.
Periodic Review and Adjustment
Periodically review and adjust Dynamic Memory settings based on the evolving requirements of virtualized workloads. This ensures optimal resource utilization.
Troubleshooting Memory Issues
In case of memory-related issues, such as performance degradation or allocation problems, review Hyper-V event logs and guest operating system logs for diagnostic information.
Dynamic Memory Allocation in Hyper-V is a powerful tool for optimizing memory usage in virtualized environments. By dynamically adjusting memory allocations based on workload demands, this feature enhances overall system performance, ensures efficient resource utilization, and contributes to a more flexible and responsive virtualized infrastructure.
Remote Management
Administering Virtualized Environments from Afar
Remote management is a key aspect of efficiently administering Hyper-V environments, especially in scenarios where physical access to the Hyper-V host may not be practical. Here’s a guide on how to effectively manage Hyper-V remotely:
Enabling Remote Management
To manage Hyper-V remotely, you need to enable remote management on the Hyper-V host. Open Hyper-V Manager, right-click on the Hyper-V host in the left navigation tree, select “Hyper-V Settings,” and check the box for “Enable Remote Management.”
Using Hyper-V Manager Remotely
Install Hyper-V Manager on a Windows machine that you want to use for remote management. Open Hyper-V Manager, click on “Connect to Server” in the Actions pane, enter the Hyper-V host’s name or IP address, and click “OK” to establish a remote connection.
PowerShell Remoting
PowerShell is a powerful tool for managing Hyper-V remotely. Use the Enter-PSSession or Invoke-Command cmdlets to establish a PowerShell remote session with the Hyper-V host.
Windows Admin Center
Windows Admin Center is a web-based management interface that provides a unified platform for managing Hyper-V hosts and virtual machines. Install Windows Admin Center on a separate machine and connect it to the Hyper-V host for remote administration.
Remote Desktop Connection
For managing virtual machines, you can use Remote Desktop Connection to connect directly to the guest operating systems running on virtual machines. Ensure that Remote Desktop is enabled on the VMs, and you have the necessary credentials.
Managing Hyper-V over Hyper-V Manager MMC Snap-in
You can use the Hyper-V Manager MMC snap-in remotely by connecting to the Hyper-V host. Open MMC (Microsoft Management Console), add the Hyper-V Manager snap-in, and connect to the remote Hyper-V host.
Securing Remote Management
Ensure that remote management is secured by using secure protocols, such as SSH or HTTPS. Implement strong authentication mechanisms, and consider using VPNs or other secure connectivity options.
Firewall and Port Considerations
Adjust firewall settings on both the Hyper-V host and the remote management client to allow the necessary traffic. Hyper-V Manager and other remote management tools use specific ports that should be open for communication.
Using Hyper-V Module in PowerShell
The Hyper-V module in PowerShell allows you to perform various Hyper-V management tasks remotely. Use commands like `Connect-VIServer` to establish a remote connection and execute Hyper-V commands.
Multi-Server Management
Hyper-V Manager and Windows Admin Center support multi-server management, allowing you to administer multiple Hyper-V hosts from a single console. This streamlines management tasks in large virtualized environments.
Configuring Remote Hyper-V Replica
If you’re using Hyper-V Replica for disaster recovery, configure it for remote replication. Ensure that Hyper-V hosts can communicate securely over the network for replication purposes.
Regular Software Updates
Keep remote management tools, such as Hyper-V Manager or Windows Admin Center, up to date. Regularly update these tools to benefit from the latest features, improvements, and security patches.
Monitoring and Alerts
Set up monitoring and alerts for remote management activities. Monitor logs and receive alerts for critical events to promptly address issues in the virtualized environment.
Effectively managing Hyper-V remotely is crucial for maintaining a virtualized environment’s health, especially in large or geographically distributed infrastructures. By using secure protocols, reliable tools, and efficient practices, administrators can streamline remote management tasks and ensure the seamless operation of Hyper-V hosts and virtual machines.
Hyper-V Best Practices and Tips
Ideally follow Hyper-V Best Practices and Tips for Optimizing Virtualization Performance. Implementing best practices in Hyper-V is essential to ensure optimal performance, reliability, and security in your virtualized environment. Here are key best practices and tips for managing Hyper-V effectively:
Host Hardware Considerations
Invest in robust and capable hardware for the Hyper-V host. Ensure sufficient CPU cores, RAM, and storage to handle the virtualized workloads. For best performance use directly connected SSD-based or faster storage.
Use Hypervisor-Specific Hardware Features
Enable and use hardware virtualization features in the host’s CPU, such as Intel VT-x or AMD-V. These features enhance virtualization performance.
Regularly Update Hyper-V and Integration Services
Keep Hyper-V and Integration Services up to date. Apply the latest updates, patches, and enhancements to benefit from improved features and security fixes.
Configure Hyper-Threading
Depending on the workload, consider enabling or disabling hyper-threading on the host’s CPU. Test performance with different configurations to determine the optimal setting.
Distribute Virtual Machines Across Hosts
Distribute virtual machines across multiple Hyper-V hosts to balance resource utilization. This enhances performance and provides redundancy.
Separate Virtual Machine Storage
Store virtual machine files (VHDs, VHDXs) on separate drives from the host’s operating system. This reduces contention and enhances disk I/O performance.
Use VHDX for Virtual Hard Disks
Prefer using the VHDX format for virtual hard disks over the older VHD format. VHDX offers improved performance, resilience, and supports larger disk sizes.
Regularly Review Resource Allocation
Periodically review and adjust resource allocations for virtual machines based on changing workload requirements. Ensure that virtual machines receive adequate CPU, memory, and storage.
Optimize Networking
Configure network adapters for optimal performance. Use high-speed network adapters, implement teaming for redundancy, and consider Quality of Service (QoS) settings.
Implement VLANs for Network Isolation
Use VLANs to isolate and segment network traffic. This enhances security and ensures that different types of traffic are appropriately separated.
Implement Backup and Disaster Recovery
Establish a robust backup and disaster recovery strategy for virtual machines. Regularly test backup and recovery processes to ensure reliability.
Monitor Performance Regularly
Use Hyper-V Manager, Performance Monitor, or third-party monitoring tools to regularly monitor the performance of Hyper-V hosts and virtual machines. Identify and address performance bottlenecks.
Implement Hyper-V Replica for Disaster Recovery
Use Hyper-V Replica or BackupChain’s alternative replication mechanism to replicate virtual machines to another Hyper-V host for disaster recovery. Ensure that replica settings align with recovery objectives.
Secure Hyper-V Hosts and Virtual Machines
Implement security best practices. Regularly update host and guest operating systems, use firewalls, and configure secure authentication methods.
Optimize Dynamic Memory Settings
Fine-tune Dynamic Memory settings for virtual machines based on workload characteristics. Ensure that the minimum and maximum memory values align with the VM’s requirements.
Document and Standardize Configurations
Document Hyper-V configurations, including virtual machine settings, networking, and storage configurations. Standardize configurations to streamline management.
Educate Administrators
Train administrators on Hyper-V best practices and keep them informed about the latest features and updates. Knowledgeable administrators contribute to a well-maintained environment.
Regularly Test Failover and Recovery Procedures
Periodically test failover and recovery procedures to ensure that disaster recovery plans are effective and can be executed seamlessly.
By incorporating these best practices into your Hyper-V management strategy, you can create a virtualized environment that is efficient, reliable, and well-optimized. Regularly review and adjust configurations based on evolving requirements to maintain peak performance and resilience.
Troubleshooting Common Issues in Hyper-V
Encountering issues in Hyper-V is not uncommon, but effective troubleshooting can help address challenges and ensure the smooth operation of your virtualized environment. Follow the steps below to troubleshoot common issues in Hyper-V:
Check Hyper-V Event Logs
Review the Hyper-V event logs on both the host and virtual machines. Look for error messages or warnings that provide insights into the nature of the issue.
Verify System Requirements
Ensure that the Hyper-V host meets the system requirements, including hardware virtualization support in the CPU. Confirm that the host is running a compatible version of Hyper-V.
Check Integration Services
Verify that Integration Services are up to date on virtual machines. Issues with communication, mouse integration, or time synchronization can often be resolved by updating Integration Services.
Review Network Configuration
Check the network configuration for both the host and virtual machines. Verify that network adapters are correctly configured, and there are no conflicts or connectivity issues.
Monitor Resource Usage
Use Hyper-V Manager or performance monitoring tools to monitor resource usage on the host and virtual machines. Identify resource bottlenecks such as CPU, memory, or disk constraints.
Inspect Storage Configuration
Examine the storage configuration for virtual machines. Ensure that there is sufficient disk space, and virtual hard disks are properly attached and accessible.
Validate Hyper-V Replica Settings
If using Hyper-V Replica, ensure that replica settings are correctly configured. Verify network connectivity between primary and replica hosts, and review replication logs for any issues.
Verify Virtual Machine Settings
Check the settings of individual virtual machines. Confirm that memory, CPU, and networking configurations align with the requirements of the workloads.
Review Hyper-V Manager Status
Use Hyper-V Manager to review the status of virtual machines. Check if virtual machines are running, paused, or in an error state. Attempt to start or resume any paused virtual machines.
Examine Hyper-V Host Health
Monitor the overall health of the Hyper-V host. Check for any system-level issues, such as disk errors, hardware failures, or other conditions that may impact virtualization.
Update Hyper-V and Integration Services
Ensure that Hyper-V and Integration Services are updated to the latest versions. Applying updates can resolve known issues and enhance compatibility.
Investigate Networking Issues
If experiencing network-related problems, investigate issues such as misconfigured VLANs, network adapter settings, or firewall restrictions that may affect connectivity.
Verify Hyper-V Replica Connectivity
If Hyper-V Replica is not functioning correctly, verify network connectivity and ensure that the required ports are open between the primary and replica hosts.
Inspect Hyper-V Host Firewall
Check the Windows Firewall settings on the Hyper-V host. Ensure that required ports for Hyper-V management and communication are allowed.
Check Hyper-V Role Status
Validate that the Hyper-V role is correctly installed and enabled on the host. Use the Server Manager or PowerShell to check the status of the Hyper-V role.
Test VM Replication
If using Hyper-V Replica, perform a test fail-over to validate the replication process. Confirm that virtual machines can be failed over and resumed on the replica host.
Review Hyper-V Licensing
Ensure that Hyper-V hosts are properly licensed. Verify licensing status to prevent issues related to licensing restrictions.
Consult Hyper-V Documentation
Refer to the Hyper-V documentation and knowledge base for specific error codes or issues. Microsoft’s support forums and community resources may provide insights and solutions.
Engage Technical Support
If troubleshooting efforts do not resolve the issue, consider engaging technical support from Microsoft or relevant vendors. Provide detailed information about the problem for efficient assistance.
Effectively troubleshooting common issues in Hyper-V involves a systematic approach, including checking logs, validating configurations, and seeking support when needed. Regular monitoring and proactive maintenance can also help prevent potential issues from arising.
Security Considerations in Hyper-V: Backing up Virtual Servers
Ensuring the security of your virtual environment is paramount to protect sensitive data, maintain compliance, and prevent unauthorized access. Hyper-V, being a critical component of your infrastructure, requires careful attention to security considerations. Here’s a guide on key security practices for Hyper-V:
Keep Hyper-V and Host OS Updated
Regularly apply security updates and patches to both the Hyper-V software and the underlying host operating system. This helps address vulnerabilities and enhance overall system security.
Secure Host Access
Limit physical access to Hyper-V hosts to authorized personnel only. Implement physical security measures, such as locked server rooms, to prevent unauthorized tampering.
Implement Role-Based Access Control (RBAC)
Utilize RBAC to control access to Hyper-V resources. Assign specific roles and permissions to individuals based on their responsibilities, limiting access to critical functions and configurations.
Secure Virtual Machine Access
Implement strong authentication mechanisms for accessing virtual machines. Utilize secure authentication methods such as multifactor authentication (MFA) to enhance access security.
Protect Virtual Machine Configuration Files
Restrict access to virtual machine configuration files and snapshots. Ensure that only authorized administrators have the necessary permissions to modify or access these critical files.
Isolate Virtual Networks
Use separate virtual networks to isolate different categories of virtual machines. This helps prevent unauthorized communication between virtual machines and enhances network security.
Regularly Audit Virtual Machine Configurations
Conduct regular audits of virtual machine configurations to identify and rectify security vulnerabilities. Review settings, permissions, and resource allocations to ensure compliance with security policies.
Implement Network Security Best Practices
Apply network security best practices within virtual networks. Use firewalls, intrusion detection systems, and network segmentation to protect against unauthorized access and potential threats.
Enable Hyper-V Shielded VMs
Consider implementing Hyper-V Shielded VMs for enhanced security. Shielded VMs use encryption and virtual TPM to protect against unauthorized access to VM data and configurations.
Regularly Back Up Virtual Machines
Establish a robust backup strategy for virtual machines. Regularly back up critical data to ensure quick recovery in the event of data loss or security incidents.
Secure Hyper-V Replication
If using Hyper-V replication, secure the replication traffic by implementing encryption. This helps protect data during transit between primary and replica Hyper-V hosts.
Monitor Security Events
Set up monitoring for security events within Hyper-V. Regularly review logs and alerts to identify potential security incidents or suspicious activities.
Educate and Train Administrators
Provide comprehensive training to administrators on security best practices for Hyper-V. Keep them informed about the latest security threats and mitigation strategies.
Regularly Test and Update Security Policies
Conduct periodic security assessments and penetration testing to identify vulnerabilities. Update security policies based on the findings and evolving security landscape.
By incorporating these security considerations into your Hyper-V environment, you can establish a robust defense against potential threats and protect the integrity and confidentiality of your virtual workloads. Security is an ongoing process, and staying vigilant is crucial to maintaining a resilient and secure virtual infrastructure.
Conclusion
By the end of this Hyper-V tutorial, you’ll have a solid understanding of how to set up, configure, and manage virtual machines using Microsoft’s Hyper-V. Whether you’re a system administrator, IT professional, or a tech enthusiast, this tutorial aims to empower you with the skills needed to harness the full potential of virtualization in your environment. Get ready to unlock a new level of efficiency and flexibility with Hyper-V.
Consider BackupChain as your Hyper-V Backup Solution
 BackupChain is a Windows Server backup software solution that provides Hyper-V backup capabilities. Below are some reasons why BackupChain would be considered an excellent choice for Hyper-V backup:
Hyper-V Integration
BackupChain is designed specifically for Windows Server and Hyper-V backup, providing seamless integration with Microsoft Hyper-V virtualization environments. This focus results in features and optimizations tailored to the Hyper-V platform.
Incremental and Differential Backups
BackupChain supports incremental and differential backup strategies, allowing users to efficiently back up only the changed data since the last backup. This can save storage space and reduce backup times.
Versioning and History
BackupChain offers backup versioning and file history features, allowing users to retain multiple versions of backups. These features are crucial for recovery purposes, enabling users to restore virtual machines to specific points in time.
Granular Backup and Recovery
BackupChain also provides granular recovery options, allowing users to restore specific files, folders, or even individual items within virtual machines. Granular recovery is essential for quick data retrieval without the need to restore entire VMs. Granular backup is unique to BackupChain; it allows backing up folders that are stored inside the VM without requiring an agent software to be installed inside the virtual machine.
Compression and Deduplication
Efficient and super fast data compression and features can help optimize storage usage and reduce the amount of data transferred during backup operations.
Centralized Management
BackupChain offers centralized management capabilities, allowing administrators to manage and monitor Hyper-V backups across multiple hosts from a single console. Centralized management streamlines administrative tasks and enhances visibility.
Encryption and Security
Security features, such as data encryption during transit and at rest, are included in BackupChain. This helps ensure the confidentiality and integrity of backup data.
Flexible Scheduling
Users have the flexibility to schedule backup jobs according to their specific needs. This includes setting up automated backup tasks, defining backup frequencies, and configuring retention policies.
Ease of Use
BackupChain might provide an intuitive and user-friendly interface, making it easier for administrators to configure and manage backup tasks. A straightforward user experience can contribute to the overall efficiency of the backup process.
White Glove Technical Support and Documentation
Fanatic technical support and comprehensive documentation are important aspects of your backup solution. BackupChain offers exceptional and reliable support channels and documentation to assist users with setup, troubleshooting, and optimization. BackupChain also offers a Platinum level support option, where the entire process from consulting, installation, backup, monitoring, and recovery, are all handled by the BackupChain team.
BackupChain Overview
BackupChain Main SiteDownload BackupChain
DriveMaker
Resources
- FastNeuron
- BackupChain (Deutsch)
- BackupChain (Spanish)
- BackupChain (Greek)
- BackupChain (French)
- BackupChain (Italian)
- BackupChain (Dutch)
- Backup.education
- Backup Sichern
- Hyper-V Blog
Other Backup How-To Guides
Windows Server Backup Software SQL Server Considerations
Windows Server Backup Software Sandbox Considerations
BackupChain Benefits
Why Windows Server Storage Spaces are Better than RAID
Why Local Windows Server File Storage Is Better than S3, AWS, Wasabi, and Azure Blob Object Storage
Why On Premise Microsoft Exchange Is Better Than Microsoft 365
Why Windows Server is More Powerful than NAS (Synology, QNAP, etc)
Why Choose Hyper-V on Windows Server over VMware vSphere?
Why Choose Windows Server Over Linux?